About Us
Executive Editor:Publishing house "Academy of Natural History"
Editorial Board:
Asgarov S. (Azerbaijan), Alakbarov M. (Azerbaijan), Aliev Z. (Azerbaijan), Babayev N. (Uzbekistan), Chiladze G. (Georgia), Datskovsky I. (Israel), Garbuz I. (Moldova), Gleizer S. (Germany), Ershina A. (Kazakhstan), Kobzev D. (Switzerland), Kohl O. (Germany), Ktshanyan M. (Armenia), Lande D. (Ukraine), Ledvanov M. (Russia), Makats V. (Ukraine), Miletic L. (Serbia), Moskovkin V. (Ukraine), Murzagaliyeva A. (Kazakhstan), Novikov A. (Ukraine), Rahimov R. (Uzbekistan), Romanchuk A. (Ukraine), Shamshiev B. (Kyrgyzstan), Usheva M. (Bulgaria), Vasileva M. (Bulgar).
Engineering
Abstract. A new method of surface plastic deformation static pulse processing, which allows you to get a smooth transition in unevenly hardened structure than excludes the possibility of crack initiation and further destruction of parts.
Found that the SIO is one of the most effective ways to PPD to regulate the varying degree of uniformity of the hardened surface layer.
The technique of determining the uniformity of the surface layer after hardening and to identify opportunities for its regulation parameters VIU.
Keywords: surface plastic deformation, uniform hardening, static pulse processing, overlap factor prints, residual stress, microhardness, shock pulses.
One of the most important tasks of modern machine building is the technological provision of a given resource of machinery, which depends directly on the operational properties of heavy-loaded machine parts.
It is known that the performance of machine parts is determined by the wear resistance of their surface, as well as by such characteristics as fatigue resistance and contact fatigue. Therefore, one of the important tasks of mechanical engineering is the creation of a surface layer, which, having high quality characteristics, would provide the necessary operational properties of machine parts. To this end, various methods of surface hardening are currently used: coating, heat treatment, surface plastic deformation, etc.
Known PPD methods (rolling, smoothing, blasting) allow to obtain the depth of the strengthened layer 2 ... 3 mm, which prevents the obtaining of a heterogeneous structure, not allowing to provide the necessary law for the distribution of hardness of the surface layer. However, the existing methods of hardening do not allow us to obtain the required depth of the strengthened layer, and at a hardening depth of 3-5 mm, stress concentrators are formed, as a result of crack formation and softening of the metal.
Static-pulse processing is a new way of PPD, allowing to solve these problems. Thus, the deforming impact of a tool with SIO is characterized not only by the energy, but also by the shape of the pulse, which is regulated by the geometric relationships of the elements of the shock system. Preliminary static pressing of the tool to the hardened surface is necessary for the implementation of a controlled impulse action, due to which the basic elasto-plastic deformation takes place.
By changing the shape of the shock pulse, the movements of the tool are regulated during the elastoplastic deformation of the material being processed. This allows you to control the diagrams of residual stresses and microhardness over the depth of the hardened layer. In this case, it is possible to regulate the uniformity of hardening of the surface layer and the alternation of layers with varying hardness [6].
It is known that an increase in the surface hardness contributes to an increase in wear resistance, and a hardened surface layer to a depth of 6 ... 8 mm significantly increases the fatigue resistance. In the course of these studies, it is of interest to have a surface layer with alternating sections of high and low hardness with a heterogeneous structure. In the conditions of operation of modern technology, the details of which undergo abrasive wear, the protruding single elements of increased hardness make it difficult for abrasive particles to contact the base material and allow them to increase wear resistance up to 10 ... 15 timesincomparisonwithheattreatment [9].
It is known that a heterogeneous structure can be obtained by chemical-thermal treatment in combination with physico-chemical effects, as well as coating. The strain hardening for the formation of structurally inhomogeneous surfaces is a promising direction because of the economical and uncomplicated processing. With surface plastic deformation, the presence in the unevenly hardened structure of a smooth transition from areas with increased hardness to areas with a low initial hardness excludes the possibility of crack initiation and further destruction.
To improve the operational properties of machine parts and the use of different uniformity of the hardened surface layer, it is necessary to develop a mechanism for controlling uniformity, depending on the parameters of static-impulse processing.
To do this, we define the parameters of the SIO controlling the uniformity of hardening of the surface layer. Under the action of impact pulses, plastic impressions are formed on the surface, the shape and size of which determine their depth, depending on the multiplicity of the action. The generalized characteristic is the overlap factor of the prints:
 , (1)
, (1)
where S - feed; f - frequency of impacts; δ is the size of the print.
The variation of K in the range 0 ≤ K ≤ 1 is of practical importance. At K = 0, the edge of one print is bordered by the edge of the other, K = 1 will correspond to the special case of repeated indentation of the instrument. With increasing overlap factor, the degree, depth and uniformity of the hardened layer increase [10].
Let's consider distribution of uniformity of hardening of a surface layer on depth and a direction of giving. Evaluation of uniformity was carried out layer by layer. It is proposed to estimate the degree of uniformity of hardening of the surface layer through the coefficient of nonuniformityλ:
 (2)
(2)


where n is the number of points in the layer in which the hardness is measured; i is the ordinal number of the point of the layer in which the hardness is measured (i = 1, ..., n); - deviation of hardness of points of the measured layer relative to the average value of hardness; -hardness of the point of the measured layer; - average value of hardness of the measured layer.
The coefficient of non-uniformity λ determines the average value of the hardness deviation from the average hardness value for the n-th number of measured points on a given layer. With increasing λ the uniformity decreases and vice versa [5].
Thus, the uniformity of surface hardening after SIO can be determined in terms of the coefficient λ, and the problem is solved when investigating the influence of the overlap factor K on the coefficient of nonuniformity λ. In this case, the problem was solved experimentally. The investigations were carried out on flat samples of steel 45, which made it possible to trace changes in the uniformity of hardening with a variation in the overlap factor. The samples obtained as a result of the experiment were cut in the feeding direction, polished sections were made, the hardness of the Vickers surface layer was measured over the depth of the surface layer and in the feeding direction. As a tool, rod rollers with a diameter of 10 mm and a width of 15 mm were used. The impact energy was 150 J. At the maximum overlap K = 0.9 the maximum hardening depth reached 6 mm, and the maximum degree of hardening was more than 60%. For other steels and a higher energy of impact pulses, a greater depth of the hardened surface layer can be obtained, reaching 10 mm [5,6].
The evaluation of the uniformity of hardening is performed as a function of the overlap factor K (Fig. 1). It was found that the greatest value of the coefficient λ = 10% is reached at K = 0 at a depth of 0.9 mm, the smallest λ = 3% at K = 0.5 at a depth of 1 mm. It should be noted that there are two characteristic layers (see Figure 1). The first is the upper surface layer with a thickness that is the most deformed after SIO. It has the greatest hardness and uniformity of hardening [7].
The second layer, in which the sections with high and low hardness alternate, has the worst uniformity of hardening. The hardness of the underlying layer, obtained as a result of cold work, is gradually leveled, i.e. there is a smooth transition to the hardness of the parent metal, and the uniformity of hardening increases.
It was established that the greatest value of the coefficient λ = 9.8% is reached at K = 0 at a depth of 0.9 mm, the smallest λ = 3% at K = 0.5 at a depth of 1 mm. It should be noted that there are two characteristic layers (see Figure 1). The first is the upper surface layer with a thickness that is the most deformed after SIO. It has the greatest hardness and uniformity of hardening.
The second layer, in which the sections with high and low hardness alternate, has the worst uniformity of hardening. The hardness of the underlying layer, obtained as a result of cold work, is gradually leveled, i.e. there is a smooth transition to the hardness of the parent metal, and the uniformity of hardening increases [7].

Figure 1. Change in the uniformity of hardening of the surface layer in depth
1) К = 0; 2) К = 0,25; 3) К = 0,5
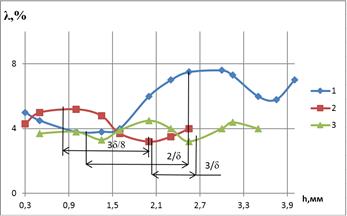
Figure 2. Change in the uniformity of hardening of the surface layer along the feed direction
1) К = 0; 2) К = 0,25; 3)К = 0,5
With an increase in the overlap factor K, the thickness of the first layer increases, and the second layer decreases. So, for K = 0: the thickness of the first layer = 0, the thickness of the second layer = 2 mm; at K = 0.25: = 1.35 mm, = 1.5 mm; at K = 0.5: = 2.8 mm, = 0.9 mm [6].
Thus, uniformity of hardening can be achieved even with a small overlap of prints with a coefficient K ≥ 0.25.
Conclusions:
· One of the promising directions for increasing fatigue resistance, wear resistance and contact endurance is the creation of a hardened surface layer with a heterogeneous structure. The use of PPD methods allows a smooth transition between sites with different hardness, which excludes the possibility of microcracks arising between them and further destruction.
· It has been established that one of the most effective PPD methods, allowing to precisely regulate the different degree of uniformity of hardening of the surface layer, is static-pulse treatment.
· A method for determining the uniformity of the surface layer after strain hardening has been developed.
· The possibilities of regulating the uniformity of the hardened surface layer with the help of SIO parameters are determined.
· It has been established that a hardened surface layer with depth up to 10 mm or more can be created with the help of SIO with a practically uniform or heterogeneous structure.
2. Smelyansky VM, Zemskov VA Technological increase of wear resistance of parts by the method of electroerosive synthesis of coatings // Hardening technologies and coatings. 2005. № 1.
3. Ivanov GP, Kartonova LV, Khudoshin AA Increase of wear resistance of parts by creation of regular heterogeneous macrostructure // Construction and road machines. 1997. № 1.
4. Kirichek A.V., Soloviev DL, Tarasov D.E. Strengthening of iron-carbon alloys by combined treatment, deformation wave and carburization // Hardening of technology and coating, 2013, No. 12
5. Kokoreva, OG Investigation of the quality parameters of the surface layer during processing by a static-pulsed method // Machines and Tools No. 3, 2012.
6. Kirichek AV, Soloviev DL, Silantyev SA Influence of static-impulse treatment modes on the uniformity of hardening of the surface layer // Forging-stamping production. Metal forming. 2004. № 2.
7. Kokoreva OG Technological possibilities of static-impulse processing // Vestnik of the Federal State Educational Institution of Higher Professional Education MGAU №3, 2013.
8. Kokoreva O.G. Development of a model for the treatment of heavy-loaded surfaces of machine parts // "High technology" № 2, 2014.
9. Erokhin M.N., Kokoreva O.G. Thermodynamic criterion for hardening of parts by dynamic methods of plastic deformation surfaces // Bulletin of the Federal State Educational Institution of Higher Professional Education MGAU No. 1, 2014.
10. Kazantsev SP, Kokoreva O.G. Control of the quality of hardening under static-impulse processing // International Technical and Economic Journal No. 4, 2014.
11. Investigation of the possibilities of hardening surfaces of thin-walled elements of aircraft using the method of surface plastic deformation / Komkov VA, Kokoreva OG, Kursakov AV // Journal of the Moscow Aviation Institute. - 2015. - №2. - P.132-136
Kokoreva O.G. CONTROL MECHANISM HARDENED SURFACE LAYER PARTS OF AGRICULTURAL MACHINERY AT STATIC-PULSE TREATMENT. International Journal Of Applied And Fundamental Research. – 2017. – № 3 –
URL: www.science-sd.com/471-25321 (05.05.2026).








 PDF
PDF